Skip to content
  • Feedback
  • Homepage
  • University Clearing
  • University Clearing
  • Getting Started
  • Handling Calls
  • Classic Home
  • End User License Agreement
  • Administrator Knowledge Base
  • Supervisor Knowledge Base
  • Agent Knowledge Base
Agent Knowledge Base
Release Notes
Agent Knowledge Base

Agent Portal and Setup

  • Getting started
    • Your Inbox
    • Agent Portal Overview
    • What I can see on my screen after I log in
    • Changing my password
    • What to do if I forget my login password
    • Agent Setup Guide
      • How to log in
      • Portal walk through
      • Status Settings
      • Making an internal call to another agent or group
      • Selecting how I receive calls
  • Communication
    • Configuring audio settings
    • Changing my contact method
    • Contacting a customer
    • Searching a queue
  • Status management
    • Using the status bar
    • Changing my current status
    • Indicating if I’m available or on a break
    • Making myself available on specific channels and/or queues only
    • Viewing the status of other agents and queues
  • Recent activity
    • Recent activity summary
    • Viewing detailed statistics
    • Viewing summary information for queues in my group(s)

Handling Calls

  • Inbound Calls
    • Answering a call
    • Having calls delivered to me automatically
    • Pick up a call that is ringing on another agent’s phone
  • Outbound Calls
    • Calling from the Outbound panel
    • Calling from the Quick Dial panel
    • Calling from your saved contacts
    • Calling from your recent calls list
  • Call Management
    • What I can see on my screen when I’m on a call
    • Using the call control buttons
    • Tasks to complete when your call ends
    • Recording a call
    • Transferring a call to a third party
    • Viewing recent calls
    • Receiving desktop notifications
    • Agent Scripts for calls

Handling Emails

  • Logging into your email server
  • Handling emails
  • Responding to an email
  • Sending an ad-hoc email
  • Activating an email
  • Forwarding an email
  • Parking an email
  • Classifying an email
  • Inserting text blocks
  • Selecting email attachments
  • Viewing and taking pending emails from queues
  • Deciding which queue’s items to take first
  • Returning or transferring an item to a queue
  • Viewing the history of an email
  • Viewing the activity timeline of an email

Handling SMS Messages

  • Sending an SMS message
  • Sending SMS messages during webchats

Handling Webchats

  • Introduction to Webchat
  • Using Webchat
  • Using Webchat Templates
  • Activating and Parking a Webchat
  • Transferring Webchats
  • Classify and Wrap-up a Webchat
  • Sharing Chat History with a Customer
  • Webchat
    • Handling webchats
    • Responding to a webchat
    • Activate a webchat
    • Sending a chat history to the webclient
    • Flagging a webchat as abusive
    • Returning or transferring an item to a queue
    • Viewing pending webchats and taking webchats from queue(s)
    • Deciding which queue’s items to take first
    • Contacting a customer via the current chat session
    • Pausing a webchat
    • Using the chat control buttons
    • Extending or ending my wrapup time
    • Inserting a template
    • Classifying a webchat

Handling Payments

  • Managing Live Payments
  • Taking, sending or refunding a payment
  • Taking pending payment transactions from queues
  • Viewing payment transactions

Scheduled calls

  • Scheduled calls
  • Scheduling a callback for the current call
  • Scheduling a callback between calls
  • Viewing and changing times for scheduled callbacks
  • Making a scheduled callback

Contacts

  • Confirming a customer’s contact record
  • Managing contacts
  • Viewing a customer’s contact history
  • Contacting a customer by email or social media
  • Updating a customer’s details
  • Looking up a customer’s contact record
  • Creating a new contact record

Third-party CRM Platforms

  • Third-party CRM platforms overview
  • Using the Contact softphone within Salesforce
  • Using the Contact softphone within MS Dynamics
  • Using the Contact softphone within Zendesk
  • CRM Troubleshooting
  • Care Connect
    • Care Connect introduction
    • Making outbound calls to patients
    • Receiving patient’s calls
    • Searching for patient’s details
  • ConConnect
    • Logging into ConConnect
    • Making an Outbound call using ConConnect

Troubleshooting

  • Capturing intermittent faults using Bug Tracking
  • Troubleshooting issues with receiving calls
  • Checks to resolve issues with WebRTC
  • Diagnosing Call Quality Issues with WebRTC Diagnostics
  • Home
  • Docs
  • Handling Webchats
  • Using Webchat
View Categories

Using Webchat

Webchats are handled in one of two ways, depending on how your account is configured. Chats may either be automatically allocated to you or placed into a webchat queue to be picked up manually.

  • If auto‑allocation is enabled, incoming webchats are automatically assigned to agents who have webchat functionality. When a chat is allocated to you, it will appear directly in your inbox. You will also see a bell notification icon in your inbox to let you know that a new chat has arrived and is ready for you to respond to.
  • If auto‑allocation is not enabled, incoming webchats are sent to a webchat queue. These chats remain in the queue until picked up. A counter will alert you to how many chats are waiting in the queue. You can then open the queue and move the chat to your inbox when you are available.

Regardless of how the chat arrives, it’s important to regularly check your inbox and notifications. Customers using webchat expect timely responses, so chats should be picked up and responded to as quickly as possible.

Responding to a webchat #

In order to respond to a webchat it needs to have been moved into your inbox. This will either have happened via auto-allocation or by picking up a webchat from a webchat queue. Once the chat is in your queue you will need to select it from the list of items in your inbox which will display the details in your workspace area.

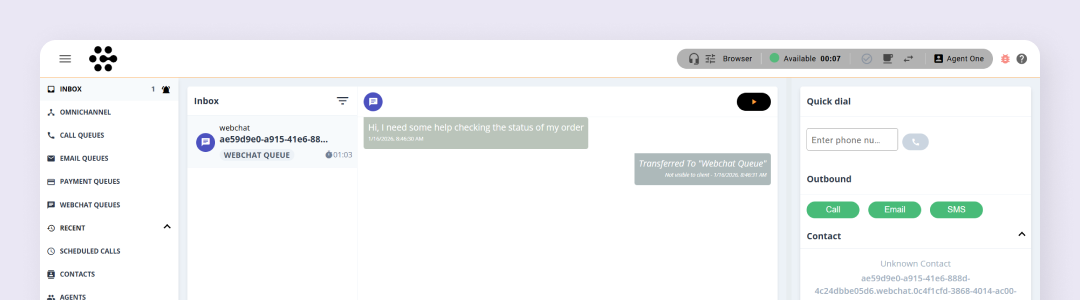
You will then need to make the chat active in order for it to become your active item. To do this click the play icon at the top of the webchat workspace area. When a you make a chat active your status will update to Handling a chat and the active item dialogue will update with various options on how to handle the webchat such as selecting a template, entering a response or assigning a contact to the chat.

You can then begin communicating with the customer. You can type responses into the message box in the active item dialogue or in the centre panel of your screen. Both you and the customer will be able to see when the other is typing so you are aware active communication is taking place.

  • Agent view - Customer is typing
  • Customer view - Agent is typing

The time a customer has been waiting for your reply is shown on their most recent message, along with an alert icon. If the waiting time reaches a set limit (configured by your company administrator), the alert icon will change colour to indicate that a response is required.

There is no time limit for how long a customer can take to reply to your messages.

Other functionality #

Webchat also includes a range of features to help you manage conversations efficiently. Response templates can be used to speed up replies and maintain consistent, professional messaging. You can pause a webchat to retain ownership and return to it later, or transfer the chat back to a webchat queue so another agent can pick it up if needed.

When a webchat ends, it enters a wrap‑up period where you can add final notes and classify the conversation. Webchats can also be classified during the chat, helping to reduce wrap‑up time afterwards.

  • Using Webchat Templates
  • Activating and Pausing a Webchat
  • Transfer Webchats
  • Classify and Wrap-up a Webchat
  • Sharing Chat History with a Customer

How did you find this training?
Introduction to WebchatUsing Webchat Templates
Table of Contents
  • Responding to a webchat
  • Other functionality

End User License Agreement