Skip to content
  • Feedback
  • Homepage
  • University Clearing
  • University Clearing
  • Getting Started
  • Handling Calls
  • Classic Home
  • End User License Agreement
  • Administrator Knowledge Base
  • Supervisor Knowledge Base
  • Agent Knowledge Base
Horizon Contact Agent
Release Notes
Horizon Contact Agent

Agent Portal and Setup

  • Getting started
    • Your Inbox
    • Agent Portal Overview
    • What I can see on my screen after I log in
    • Changing my password
    • What to do if I forget my login password
    • Agent Setup Guide
      • How to log in
      • Portal walk through
      • Status Settings
      • Making an internal call to another agent or group
      • Selecting how I receive calls
  • Communication
    • Configuring audio settings
    • Changing my contact method
    • Contacting a customer
    • Searching a queue
  • Status management
    • Using the status bar
    • Changing my current status
    • Indicating if I’m available or on a break
    • Making myself available on specific channels and/or queues only
    • Viewing the status of other agents and queues
  • Recent activity
    • Recent activity summary
    • Viewing detailed statistics
    • Viewing summary information for queues in my group(s)

Handling Calls

  • Inbound Calls
    • Answering a call
    • Having calls delivered to me automatically
    • Pick up a call that is ringing on another agent’s phone
    • Troubleshooting issues with receiving calls
  • Outbound Calls
    • Calling from the Outbound panel
    • Calling from the Quick Dial panel
    • Calling from your saved contacts
    • Calling from your recent calls list
  • Call Management
    • What I can see on my screen when I’m on a call
    • Using the call control buttons
    • Tasks to complete when your call ends
    • Recording a call
    • Transferring a call to a third party
    • Viewing recent calls
    • Receiving desktop notifications
    • Agent Scripts for calls

Handling Emails

  • Logging into your email server
  • Handling emails
  • Responding to an email
  • Sending an ad-hoc email
  • Activating an email
  • Forwarding an email
  • Parking an email
  • Classifying an email
  • Inserting text blocks
  • Selecting email attachments
  • Viewing and taking pending emails from queues
  • Deciding which queue’s items to take first
  • Returning or transferring an item to a queue
  • Viewing the history of an email
  • Viewing the activity timeline of an email

Handling SMS Messages

  • Sending an SMS message
  • Sending SMS messages during webchats

Handling webchats

  • Handling webchats
  • Responding to a webchat
  • Using the chat control buttons
  • Activate a webchat
  • Pausing a webchat
  • Inserting a template
  • Classifying a webchat
  • Extending or ending my wrapup time
  • Contacting a customer via the current chat session
  • Deciding which queue’s items to take first
  • Viewing pending webchats and taking webchats from queue(s)
  • Returning or transferring an item to a queue
  • Sending a chat history to the webclient
  • Flagging a webchat as abusive

Handling Payments

  • Managing Live Payments
  • Taking, sending or refunding a payment
  • Taking pending payment transactions from queues
  • Viewing payment transactions

Scheduled calls

  • Scheduled calls
  • Scheduling a callback for the current call
  • Scheduling a callback between calls
  • Viewing and changing times for scheduled callbacks
  • Making a scheduled callback

Contacts

  • Confirming a customer’s contact record
  • Managing contacts
  • Viewing a customer’s contact history
  • Contacting a customer by email or social media
  • Updating a customer’s details
  • Looking up a customer’s contact record
  • Creating a new contact record

Third-party CRM Platforms

  • Third-party CRM platforms overview
  • Using the Contact softphone within Salesforce
  • Using the Contact softphone within MS Dynamics
  • Using the Contact softphone within Zendesk
  • Troubleshooting
  • Care Connect
    • Care Connect introduction
    • Making outbound calls to patients
    • Receiving patient’s calls
    • Searching for patient’s details
  • ConConnect
    • Logging into ConConnect
    • Making an Outbound call using ConConnect
  • Home
  • Docs
  • Handling Emails
  • Sending an ad-hoc email
View Categories

Sending an ad-hoc email

You can send an email to a customer at any time, including during a call. You do not need to be responding to an email that has been received in an email queue.

For information on responding to emails that you receive from a queue, see Handling emails.

Send an email #

  1. In the Outbound panel, click Email () and the Email: Select Template dialog is displayed
    • Depending on your role you may see Call, Email and SMS buttons
  2. Select an email template from the dropdown list
    • Only one email template can be used per email.
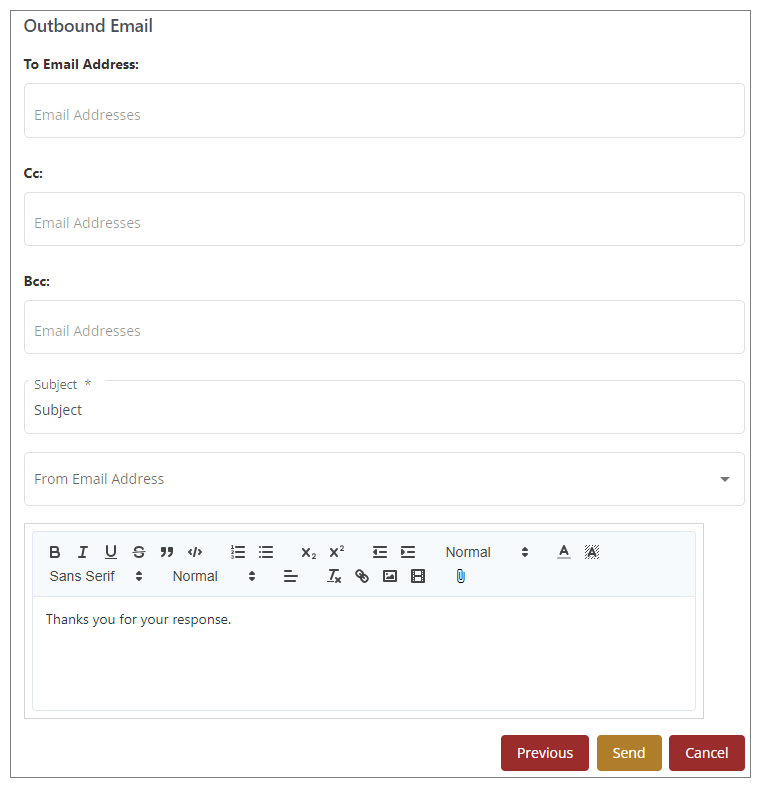
  3. Click Next and the Outbound Email dialog is displayed
  4. Complete the email using the selected template
  5. (Mandatory) For To Email Address: enter the email address to which the email should be sent
    • Multiple email addresses can be added here (but only if your company administrator has authorised you to add or amend email recipients)
    • To delete an email address, click: Grey circle with white x inside
  6. For Cc: and Bcc:, enter the email addresses for Carbon Copy (CC) and Blind Carbon Copy (BCC) email recipients if required
  7. (Mandatory) For Subject, enter the subject of the email
  8. For From Email Address, select the email address of the sender from the dropdown list
  9. Enter your email text and use the rich text editor to format your text as required
  10. To attach a file from your own PC to your email:
    • In your text editor toolbar, click:
    • Navigate to the file that you want to attach, select it and click OK
    • Your file will be attached below the email body text
  11. Review the email and click Send
Note: If you sent the email during a call, you must make the call active again by going to your Inbox and, for the appropriate call, clicking:
Outbound Email dialog

Troubleshooting:

The Email button will be greyed out (meaning that you cannot send outbound emails) if:

  • No SMTP servers are available to send outbound email
  • Your inbox is full (it contains the maximum number of emails and/or SMS messages). In this instance, a message is displayed, alerting you to the situation. To clear the message, click: X

How did you find this training?
Responding to an emailActivating an email
Table of Contents
  • Send an email

End User License Agreement