Skip to content
  • Feedback
  • Homepage
  • University Clearing
  • University Clearing
  • Getting Started
  • Handling Calls
  • Classic Home
  • End User License Agreement
  • Administrator Knowledge Base
  • Supervisor Knowledge Base
  • Agent Knowledge Base
Horizon Contact Agent
Release Notes
Horizon Contact Agent

Agent Portal and Setup

  • Getting started
    • Your Inbox
    • Agent Portal Overview
    • What I can see on my screen after I log in
    • Changing my password
    • What to do if I forget my login password
    • Agent Setup Guide
      • How to log in
      • Portal walk through
      • Status Settings
      • Making an internal call to another agent or group
      • Selecting how I receive calls
  • Communication
    • Configuring audio settings
    • Changing my contact method
    • Contacting a customer
    • Searching a queue
  • Status management
    • Using the status bar
    • Changing my current status
    • Indicating if I’m available or on a break
    • Making myself available on specific channels and/or queues only
    • Viewing the status of other agents and queues
  • Recent activity
    • Recent activity summary
    • Viewing detailed statistics
    • Viewing summary information for queues in my group(s)

Handling Calls

  • Inbound Calls
    • Answering a call
    • Having calls delivered to me automatically
    • Pick up a call that is ringing on another agent’s phone
    • Troubleshooting issues with receiving calls
  • Outbound Calls
    • Calling from the Outbound panel
    • Calling from the Quick Dial panel
    • Calling from your saved contacts
    • Calling from your recent calls list
  • Call Management
    • What I can see on my screen when I’m on a call
    • Using the call control buttons
    • Tasks to complete when your call ends
    • Recording a call
    • Transferring a call to a third party
    • Viewing recent calls
    • Receiving desktop notifications
    • Agent Scripts for calls

Handling Emails

  • Logging into your email server
  • Handling emails
  • Responding to an email
  • Sending an ad-hoc email
  • Activating an email
  • Forwarding an email
  • Parking an email
  • Classifying an email
  • Inserting text blocks
  • Selecting email attachments
  • Viewing and taking pending emails from queues
  • Deciding which queue’s items to take first
  • Returning or transferring an item to a queue
  • Viewing the history of an email
  • Viewing the activity timeline of an email

Handling SMS Messages

  • Sending an SMS message
  • Sending SMS messages during webchats

Handling webchats

  • Handling webchats
  • Responding to a webchat
  • Using the chat control buttons
  • Activate a webchat
  • Pausing a webchat
  • Inserting a template
  • Classifying a webchat
  • Extending or ending my wrapup time
  • Contacting a customer via the current chat session
  • Deciding which queue’s items to take first
  • Viewing pending webchats and taking webchats from queue(s)
  • Returning or transferring an item to a queue
  • Sending a chat history to the webclient
  • Flagging a webchat as abusive

Handling Payments

  • Managing Live Payments
  • Taking, sending or refunding a payment
  • Taking pending payment transactions from queues
  • Viewing payment transactions

Scheduled calls

  • Scheduled calls
  • Scheduling a callback for the current call
  • Scheduling a callback between calls
  • Viewing and changing times for scheduled callbacks
  • Making a scheduled callback

Contacts

  • Confirming a customer’s contact record
  • Managing contacts
  • Viewing a customer’s contact history
  • Contacting a customer by email or social media
  • Updating a customer’s details
  • Looking up a customer’s contact record
  • Creating a new contact record

Third-party CRM Platforms

  • Third-party CRM platforms overview
  • Using the Contact softphone within Salesforce
  • Using the Contact softphone within MS Dynamics
  • Using the Contact softphone within Zendesk
  • Troubleshooting
  • Care Connect
    • Care Connect introduction
    • Making outbound calls to patients
    • Receiving patient’s calls
    • Searching for patient’s details
  • ConConnect
    • Logging into ConConnect
    • Making an Outbound call using ConConnect
  • Home
  • Docs
  • Third-party CRM Platforms
  • Care Connect
  • Care Connect introduction
View Categories

Care Connect introduction

Care Connect with EMIS/SystmOne #

Care Connect is a standalone Windows app that third-party systems and Contact can use to facilitate tasks such as calling a patient and seeing who is calling you. Care Connect currently integrates with:

  • EMIS
  • SystmOne

EMIS and SystmOne are platforms that record medical information about patients which is used by GP surgeries. You are probably already used to using either the EMIS Web/SystmOne program to view and contribute to patients’ electronic healthcare records.

Note: You can only use the Care Connect app if you are authorised to do so by your company administrator.

Logging in #

This procedure assumes that you are already logged into your Contact Agent Portal.

After logging into EMIS Web/SystmOne and Contact, you can then log into the Care Connect app using your Contact credentials. Once you are logged in, you can view patients’ information, call patients using “Click to dial”, and receive calls from patients.

EMIS
SystmOne

To use Care Connect, you must first log into EMIS Web and then log into the Care Connect app.

Log into EMIS #

Log into EMIS Web in your usual way:

  • Enter your login details (username, password and organisation ID) or
  • Enter your Smartcard passcode (if you have one)
A screenshot of a login pageDescription automatically generated with low confidence

Set your status in Contact #

Ensure that your status in your Contact Agent Portal displays “Available”. If it does not, set yourself to available on the status bar.

Sign in to Care Connect #

Search for Care Connect on your Windows taskbar and open the app.

Sign in to the Care Connect app by entering the username and password for your Contact user account, and then click Connect to Contact.

The Care Connect app is launched:

To use CareConnect, you must first log into SystmOne and then log into the CareConnect app.

Log into SystmOne #

Log into SystmOne in your usual way:

  • Enter your login details (username and password) or
  • Enter your Smartcard passcode (if you have one)

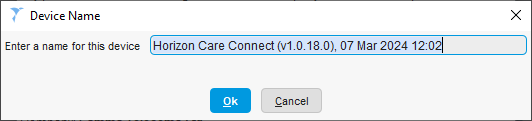
If this is the first time that you are logging into SystmOne on this device, you are required to approve the device.

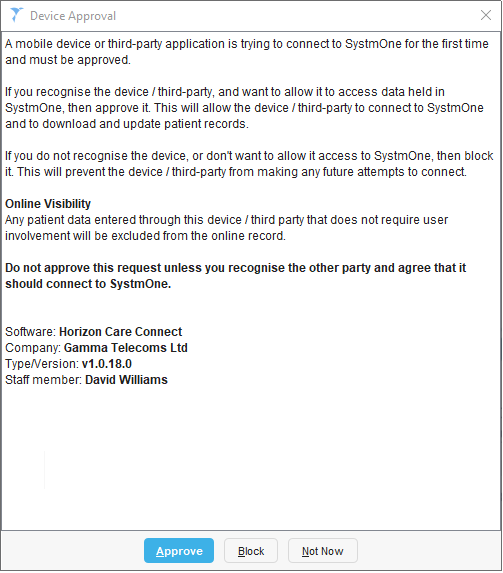
Following approval, you are also required to enter a name for the device.

The SystmOne client is launched.

Set your status in Contact #

Ensure that your status in your Contact Agent Portal displays “Available”. If it does not, set yourself to available on the status bar.

Sign in to Care Connect #

Search for Care Connect on your Windows taskbar and open the app.

Sign in to the Care Connect app by entering the username and password for your Contact user account, and then click Connect to Contact.

The Care Connect app is launched:

How did you find this training?
Table of Contents
  • Care Connect with EMIS/SystmOne
  • Logging in
    • Log into EMIS
    • Set your status in Contact
    • Sign in to Care Connect
    • Log into SystmOne
    • Set your status in Contact
    • Sign in to Care Connect

End User License Agreement