You can send an email to a customer at any time, including during a call. You do not need to be responding to an email that has been received in an email queue.
For information on responding to emails that you receive from a queue, see Handling emails.
Send an email #
- In the Outbound panel, click Email (
 ) and the Email: Select Template dialog is displayed
- Depending on your role you may see Call, Email and SMS buttons
- Select an email template from the dropdown list
- Only one email template can be used per email.
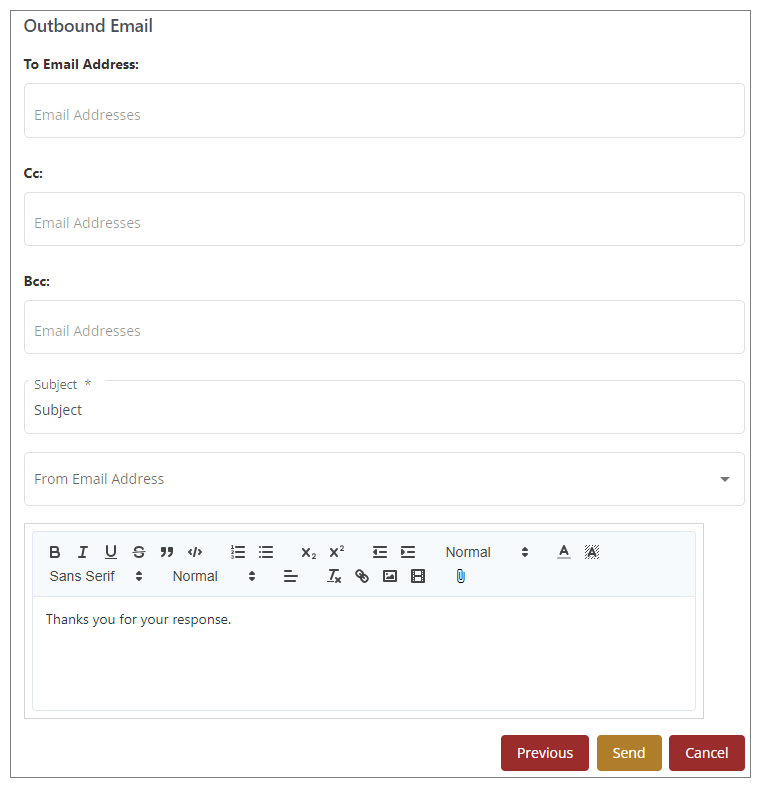
- Click Next and the Outbound Email dialog is displayed
- Complete the email using the selected template
- (Mandatory) For To Email Address: enter the email address to which the email should be sent
- Multiple email addresses can be added here (but only if your company administrator has authorised you to add or amend email recipients)
- To delete an email address, click:

- For Cc: and Bcc:, enter the email addresses for Carbon Copy (CC) and Blind Carbon Copy (BCC) email recipients if required
- (Mandatory) For Subject, enter the subject of the email
- For From Email Address, select the email address of the sender from the dropdown list
- Enter your email text and use the rich text editor to format your text as required
- To attach a file from your own PC to your email:
- In your text editor toolbar, click:

- Navigate to the file that you want to attach, select it and click OK
- Your file will be attached below the email body text
- In your text editor toolbar, click:
- Review the email and click Send
Note: If you sent the email during a call, you must make the call active again by going to your Inbox and, for the appropriate call, clicking:  |

Troubleshooting:
The Email button will be greyed out (meaning that you cannot send outbound emails) if:
- No SMTP servers are available to send outbound email
- Your inbox is full (it contains the maximum number of emails and/or SMS messages). In this instance, a message is displayed, alerting you to the situation. To clear the message, click: X
